Related

Wednesday, April 24, 2013

An overview of the operation of home electrical wiring safety devices, specifically circuit breakers


All home electrical systems require some type of protective device to guard against excessive current; the two most common ones are the fuse and circuit breaker. Fuses are mostly found in older structures that have not been updated. The predominant device found in modern homes is the circuit breaker.

When a current flows through any substance, including wires, it generates heat. The larger the current that flows in the wire, the more heat generated. Electrical current flowing in a wire also creates a magnetic field around that conductor. This field of magnetism increases as current increases. These two basic physical principles are the key design components of the modern circuit breaker. They can be used separately, or in combination, to achieve specific circuit requirements.

The circuit breaker is actually an automatic switch. The basic operating interface between the breaker device and the homeowner is the switch-like handle on the front. This handle can actually be used as a manual switch if necessary. This handle typically has four positions: off, on, tripped and reset. The on and off positions are usually marked in some way. The tripped position can be indicated in several ways. The two most common are a red mark showing somewhere on the face of the breaker, or the handle will move halfway between the on and off positions. The reset position usually involves moving the handle in the off direction until a click is heard. At that point the breaker can again be turned back to the on position.

A word of caution is advised before you try to reset a breaker and turn it back on. Since it is designed as a protective device and has just performed its duty admirably, it is obvious that something went wrong somewhere along the circuit from the panel box outward through the structure. It is imperative that the problem is found and corrected before the breaker is again turned on. Usually this will involve turning some appliance off or unplugging it altogether. If the fault is not corrected the circuit breaker will again trip until needed repairs or appropriate action is taken.

As I mentioned earlier a circuit breaker is similar to a switch, like the one in the hall of your home. Many of the basic components found in wall switches are also integral parts of the breaker. The toggle handle plus some combination of levers, springs and contacts is common to both. The typical breaker will also add either a bimetallic sensor to detect the rise in heat or a coil of wire to create a magnetic field, and perhaps both.

The bimetallic sensor is a strip composed of two different metals sandwiched together; the two metals selected expand at different rates. When a current is flowing through the strip a small amount of heat is produced. As the current increases so does the heat. Since the two metals are mechanically bonded together, they expand, but at different rates. This difference in expansion causes the strip to bend. The strip is attached to a series of levers and latches. The action involved is much like a mechanical lock. When the strip moves the lever far enough it unlocks the spring loaded handle which then moves toward the off position opening the electrical contacts and stopping the current.

Since current flowing through the metal strip requires a short but specific delay to heat the metal, it can be designed to allow for small overloads of fairly short duration. This is an advantage for circuits that have motors on them, which typically will draw a large current for a very brief period of time as they come up to speed. Commonly breakers of 30 amps or less are designed this way.

The magnetic sensor in a circuit breaker is composed of a wound coil of wire and a metal plate or rod placed within the coil's magnetic field. This plate or rod is connected to the latching mechanism in a similar manner as the bimetallic strip. This combination of coil and plate or rod is engineered so that under normal current loads the force of the magnetic field is insufficient to move the lever and unlock the handle.

As current increases past a pre-designed maximum, the force of the coil increases sufficiently to move the rod or plate, operate the lever or latching mechanism thus turning the circuit breaker off. Since a very large and rapid increase in current past the design rating of the breaker is usually associated with a serious problem this method of tripping a breaker adds an extra element of safety.

This action is much faster than the heat method of activation and protects the circuit when larger overloads are sensed; not allowing for a time delay which might cause equipment damage or a fire hazard. Putting both methods of operation together into one circuit breaker combines the positive features of both, yielding added safety.

Circuit breakers are convenient because they have the same current ratings as fuses, but unlike the fuse, they may be reset and used again; no spares are needed. Since you don't need to keep a box of them on hand for emergencies, they have become commonplace in modern electrical branch circuits and as the main cutoff for most panel boxes.
What Do Fuses or Circuit Breakers Do?


A fuse or circuit breaker protects the wiring in an electrical circuit from allowing too much current to flow. A short circuit, for example, could be caused by two wires mistakenly crossed (a nail driven through the wall and touching two wires) that could cause a huge current flow and start a fire. Without fuses and circuit breakers, electrical circuits would simply catch on fire too many times for electricity to be considered a safe and practical energy to use. Since equipment will fail and wiring problems will happen, fuses or circuit breakers need to be included in circuits for safety.
Fuses work on the simple concept that when current flows through wire it generates heat, the more current flow, the more heat. The thin wire in a fuse will only allow a certain amount of current to run through it until it heats and disintegrates. The thin wire in the fuse is now gone and no current can flow the circuit. When current was flowing through the fuse and the rest of the circuit, it was a closed circuit, but when the fuse blows, it becomes an open circuit. No current flows in an open circuit. So fuses work well, but they only work one time. After the wire in a fuse burns out, that fuse must be removed and thrown away and a new fuse must be installed.
The circuit breaker accomplishes the same function as a fuse, but uses a simple switch to detect over-current situations. Therefore the circuit breaker can trip and be reset many times. 

What is the Difference between KW and KVA?


What is the Difference between KW and KVA?


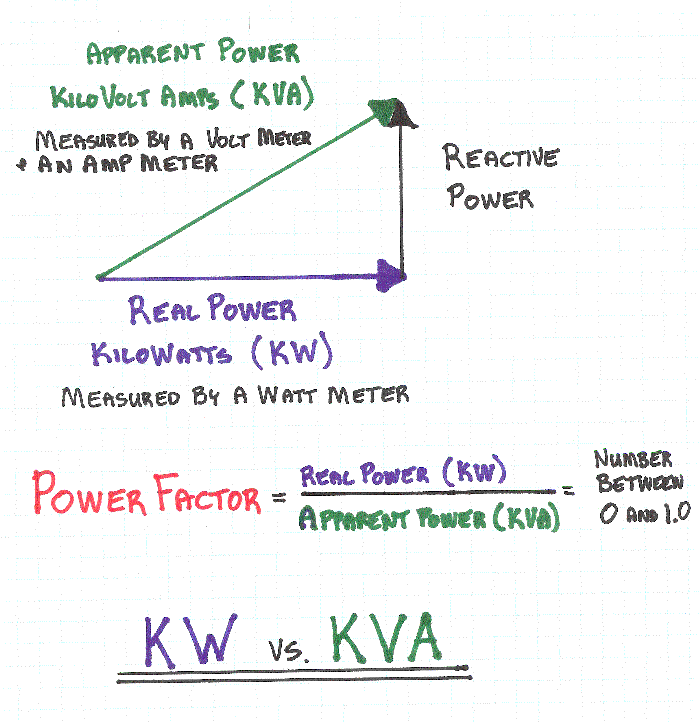
Electrical utility companies provide volt-amperes to customers, but bill them for watts. Understanding this concept will help you better understand many of the decisions made by project owners and electrical engineers. Since the Power Law shown above lists Watts = Volts x Amps, you may think that the number of volt-amperes should be the same as the number of watts. After all, that's what the Power Law equation states. And it's true when the load is resistive, say an electrical heating element that uses all the power that is delivered to it by changing the electrical energy into heat energy. A motor or a fluorescent light, on the other hand, are reactive loads in that part of the electrical power that goes to them gets absorbed, then returned to the circuit without being used. The reactive portion of the load dissipates no power.

Let's look at it a different way. When trying to understand generators that are specified for a project, you will often see them listed with KVA numbers. So what does that mean? If you know that you will have 100 amps of load at 208 volts, you'd need an transformer with at least 20.8 KVA. If you installed that transformer and measured the volts you'd see 208 volts and an amp meter would show 100 amps. But since part of that current goes back into the circuit without being used, the real power (or the KiloWatts) would be less than 20.8 KW. The figure below illustrates:
So with our generator example above, if the power factor is 0.8, then the real power used will be 20.8 KVA x 0.8 power factor or 16.6 KW.
Since we're discussing generators, it's good to know that the industry standard power factor assumed for rating generators is 0.8. But the reality of what the generator will actually drive under load depends on the actual power factor. To continue with the above example, if you use a 16.6 KW generator but lots of small induction motors are being powered and the true power factor is 0.6, then the apparent power required will be 16.6 KW / 0.6 = 27.7 KVA. The right conclusion to draw, though, is to discuss and purchase generators using the KVA requirements, not the KW.

Electricity Safety Tips For Industrial Electricians


Follow these electricity safety tips to keep yourself healthy and safe.
A work site is a dangerous place. With high voltage and huge equipment, an industrial electrician is faced with life-threatening dangers constantly.
Working in high places is a situation which calls for perfect electricity safety practices.
There are many rules and regulations in place to keep you safe, but common sense goes a long way. Many potential hazards can be easily spotted and corrected before a serious accident happens. Keep a few electricity safety tips on the top of your mind at all times and all should go well.
If you spot a defective extension cord, do not use it: replace it immediately. If you see a light fixture that looks like it might fall, stand back and let it fall!
Replacing that fixture is much easier than replacing an eye or a finger, not to mention, if it still has juice flowing to it, you could get a severe shock.

Your Safety is Your Responsibility

Always wear the proper safety clothing and protective gear, like shatter-proof eye protection and non-conductive work boots or other industrial safety footwear.
When working with live circuits, use just one hand and keep yourself insulated at all times.
Housekeeping is a very important daily task for an industrial electrician. Leaving material or tools on a job site can cause tripping hazards for others.
Every industry and firm will have their own set of electricity safety tips, but there are general rules for all industrial electricians to follow.

Plan For Safety

Plan your job carefully and consider all the potential hazards before you start. Always be aware of your surroundings.
Smart ideas include isolating equipment from energy sources, identifying potential electric shock and arc flash points, and establishing clear approach limits to make sure unqualified workers don't wander too close.
Before touching a circuit or conductor, test it for voltage. Never work on electrical equipment or conductors until they have been de-energized, properly locked or tagged out, and all chance of exposure has been eliminated.
When you you work in a live area, even for a short period of time, put on the proper lockouts and tagouts. This also applies when you are working behind equipment where others may not see you and accidentally try to use the equipment with you inside.

Ladder Safety

Ladder Safety is an important part of industrial workplace safety
Whenever a ladder or other elevated equipment is being used, by you or someone else, check and double-check for overhead power sources and obstructions. If the equipment knocks down one of these lines, anyone standing close by can be seriously hurt, maybe even killed.
Verify underground electrical circuits before digging. Know the location of circuit boxes and breakers.


When a circuit breaker gets tripped, find the cause of the trip before you reset it. A circuit breaker is a warning that some serious problems could be hiding somewhere down the line. Usually it is caused by an overload. If you ignore the overload, an electrical fire could break out.
Electricity is a powerful force not to be taken lightly. Follow special electricity safety tips, rules and regulations as they apply to your situation.


How the Voltage Regulator Circuit Works


Before you attach the 9V battery, all points in the circuit are at ground (0V). To understand how the voltage regulator circuit works, first consider how it operates without the capacitor.

With the switch in the off position, a voltage is put on the Zener diode through R14.

(A Zener diode is a unique type of diode that allows the current to flow forward the same way as an ideal diode, but can also allow it to flow in reverse when the voltage is higher than a certain value known as the breakdown voltage. It was named after the physicist who discovered this phenomenon, Clarence Zener. The device is commonly used to provide a reference point for voltage regulators, or to protect other semiconductors from momentary voltage pulses). 

R14 is used so the Zener diode will be in the reverse breakdown mode. As a result, the voltage will be held at a constant 5.6V all across the diode. The 5.6V in this example is also maintained along the transistor and load reistor base emitter junction in the series. Because the voltage is greater than 0.7V, the diode at the base emitter is biased towards the front and the current flows into the base of the transistor.

This means that as long as the Zener diode is in reverse mode and the base emitter is biased to the front, the voltage across the resistor will be fixed at 5.6 – 0.7 = 4.9V.

To understand how the circuit is able to always hold the voltage around a constant 5V, consider the flow of the current in the circuit. As the current flows through R14, it splits between the base emitter diode and the Zener diode. 

If Ib is the current flowing into the the base, a current equal to ßIb will flow from the battery into the collector. Because the transistor is set to function in the forward mode, a current equal to (ß + 1)Ib will flow out of the emitter and pass through the load resistor.

If there is a change in the load resistor, then the current flowing through the Zener diode will change as well, so that the base current and the emitter current can maintain the correct value to put out the required 5 V all across the load resistor.

Since the capacitor is the component in the circuit capable of storing the electrical charge, it is used in this example to help maintain the output of the voltage regulator at a constant rate over time.

The voltage change rate across a capacitor is proportionate to the amount of current flowing from it, divided by the amount of electricity it is able to store. Therefore, the bigger the capacitor, the less of a voltage output change there will be over time for a fixed current drain. 

Voltage Regulator Circuit


A voltage regulator circuit, or a DC to DC converter, is needed to convert a DC voltage supply, one that is fixed over time, such as a battery, to another DC voltage.
To covert a 110 AC power source (alternating current like the outlets in the wall) into a 5 V DC power source, the circuit would be an AC-DC converter. 

For example, say there are 2 types of batteries connected in a series to act as voltage sources – a 9 V battery and two 1.5 V batteries that are to act as a 3 V source. But, different circuits in your project require different voltage sources, so you may not be able to directly hook the battery to the power circuits.

In this example, one component is designed to function with a constant 5 V source. This means you will have to convert the 9 V battery into a 5 V source. A voltage regulator circuit can make this conversion.

How to Build a Voltage Regulator Circuit

In order to convert the 9 V battery into a constant 5 V source you have to build a voltage regulator circuit. The voltage regulator circuit is made up of 5 components:
  1. 9V battery – The 9V battery is a rectangular prism shape with rounded edges and a polarized snap connector on the top.
  2. Resistor – This is a passive two-terminal electrical component used to present electrical resistance.
  3. Diode – This component has an asymmetric transfer feature, with one low (preferably zero) resistance to current flow in one direction, and high (preferably infinite) resistance in the other.
  4. Transistor – This is a semiconductor used to amplify and switch electronic signals and power.
  5. Capacitor – This is the component that stores the electrons.
You need to be extremely careful. If you accidentally interchange the base and collector the transistor will be destroyed immediately.
Another thing that could potentially cause a problem is that the capacitor is electrolytic – this means it can only tolerate voltages applied in one direction. The capacitor will be destroyed if the voltages are reversed.

Understanding the Differences Between a Series and Parallel Circuit


What is a series and parallel circuit? How are they different from one another, and can you use them in combination?
Circuits with just one load resistance and one battery can be analyzed quite simply, but are not usually found in practice.
More commonly, you will see circuits where two or more components are connected together. These will be connected in either a series or parallel circuit. 

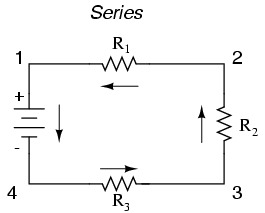
A series circuit:

Learn the difference between a series and parallel circuit
In this example there are three resistors (R1, R2, and R3 – the numbers are for identification only and do not represent the value in ohms).
They are connected from one battery terminal to the other. The main characteristic defining a series circuit is that the electrons can only flow in one direction, along just one path.
This circuit shows the electrons flowing counter-clockwise, from point 4 through to 1 and back around to 4. 

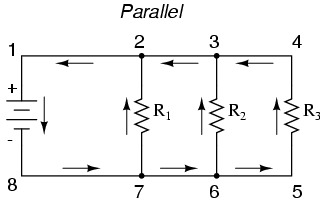
A parallel circuit:

Learn the difference between a series and parallel circuit
There are still three resistors in this example, but this time the electrons have more than one path where they can flow continuously. The one from 8 to 7 to 2 to 1 and back to 8.
One from 8 to 7 to 6 to 3 to 2 to 1 and back to 8. And the one from 8 to 7 to 6 to 5 to 4 to 3 to 2 to 1 and back to 8. Each of the paths (through R1, R2, and R3) are called branches. 

A parallel circuit is when all components are connected in between common electrical points. Note that points 1, 2, 3, and 4 are all electrically common. As are points 8, 7, 6, and 5. The battery and all of the resistors are connected between these points.

In many cases you will see a combination series and parallel circuit:

A typical series and parallel circuit combination
This example combination series and parallel circuit shows two loops where the electrons travel – one from 6 to 5 to 2 to 1 and back to 6, and the other from 6 to 5 to 4 to 3 to 2 to 1 and back to 6.
Note how the path of both currents pass through R1 (from point 2 to point 1). This means that R2 and R3 form a parallel, while R1 forms a series with the R2-R3 parallel combination.

Basic Electrical Circuits Explained


Basic electrical circuits are made up three components – voltage, resistance and current.
  • Voltage (E) is an imbalance of electron distribution or a charge difference between two points. Measured in volts (V)
  • Resistance (R) is the opposition to current flow, how hard it is for charges to move within the system. The units of resistance are measured in ohms
  • Current (I) this is the movement of electrons. In basic electrical circuits with a path, electrons will move from the negative pole to the positive pole. Measured in ampres (A)
An electrical circuit needs a never ending looped pathway for electrons to travel along. Electrons need an eloctro motive force (EMF) source and destination.
In order to make this source-destination system work, both the source and the destination would need to have an infinite capacity to allow the electrons to sustain a continuous flow.

When you take a wire, or join many wires together, and loop it to form a continuous path, you have what electrons need to flow without the need of an infinite supply of sources and destinations. 

When all of the electrons are advancing in a clockwise motion in the circuit, they push the ones before them forward, just as if you had a hula hoop full of marbles. This is a circuit, and you now have the ability to support a continuous flow of electrons.

Continuity in a circuit is just as important as it is in a straight source to destination set up. Any break in the circuit will stop the flow of electrons. Where the break is does not make any difference. The wire or conductive material must be unbroken from start to finish in order to sustain the flow of electrons.

For example, if you turn on a lamp and it will not light up, there are two possible causes – either the bulb is burnt out or there is a break in the wire.

Both of these causes stop the flow of electrons. The electrons can not pass through a burnt out bulb because the filament is broken. Just as it can not pass through a broken wire.

Why Homes Need a Electric Circuit Breaker


Electricity is delivered to homes and other buildings from the power distribution grid. Inside these buildings, the electric charge moves throughout a large circuit, which is made up of many smaller circuits. The hot end of the wire leads to the power plant.
The neutral end of the wire leads to the ground. Since the hot wire is connected to a high source of energy, and the neutral end is connected to the ground, there is a voltage across the circuit. The charge moves when the circuit is closed. This is called an alternating current because the current is rapidly changes directions.

The electricity delivered from the power distribution grid is a consistent voltage (in the U.S. this is 120 and 240 volts), however the current within the building (the resistance) can vary dramatically.

All of the different devices using power put up a certain mount of resistance, which is called the load. It is the resistance that makes the device work.
For example, the filament inside some light bulbs are very resistant to the flow of the charge. The charge has to work extra hard to heat the filament, making the bulb glow – which is also why this type uses more energy. 

The wiring in a building is set up so that the hot and neutral never touch. The charge running through the circuit must always pass through an appliance first, which is the resistor in this case. That means the electrical resistance in the device or appliance is able to limit how much of a charge can pass through. 

When the voltage and resistance are constant, the current must be constant, as well. For safety reasons, appliances are designed to keep the current at low levels. If the charge was allowed to run free, the wires in the appliance and in the building could heat up to unsafe levels, resulting in a fire.

How circuit breakers work to keep you safe is by "cutting the juice" any time the current jumps to unsafe levels.

What is a Electric Circuit Breaker?


To prevent an overload, an electric circuit breaker is installed. The circuit breaker is a switch. Plain and simple. How it works is very complex in one sense, but very simple in another. You will learn all the ins and outs during your studies as an electrician apprentice.
Electricity flowing through a circuit needs to have a continuous flow. Any break in this flow will instantly cut the "juice", or power. Any device depending on this juice will stop in its tracks. In most cases you don't want this to happen.
The last you want is for the power to suddenly cut off when you are in the middle of a vital cut with your electrical saw, or at the climax of an extremely intense movie.

But, there are times when a sudden cut in the power supply can save your a home. A circuit breaker may not save your life, but it will save the life of the fuses in a home you are working in, or expensive appliances.

Simple Electrical Formulas


Steps In Calculating Usage Costs

1. Volt x Amps = Watts
2. Watts / 1000 = Kilowatt (kW)
3. Kilowatt (kW) x Hours Of Use = Kilowatt Hour (kWh)
4. Kilowatt Hours (kWh) x kWh rate = Cost Of Usage
Steps In Calculating VA (Volt/Amps) for UPS (Uninterruptible Power Supply) Systems
1. Total amperes of all equipment to be used on UPS. 

Rule of Thumb:
(MMX PC's average 2.8 Amps beginning 1997)
(PCs average 3.5 Amps prior to 1997)

1. If the equipment lists total watts only, use W x 1.4 to obtain VA
2. Total Amps x 120 Volts = VA (Volt Amps)
3. VA x 1.2 = Total VA
4. Choose the UPS that is rated higher than the Total VA
An example:
The average pool pump will have a rating of 7 to 10 amps and run 24 hours a day when the pool is being used. To figure the energy used to run this pump, we will first determine the amount of kilowatt-hours required for a month.
Kilowatt-hours can be found in the following steps;

Amps x volts = WATTS
10 Amps x 120 volts = 1200 Watts,
1200 Watts x 24 hours = 28,800 Watts, for one day.
28,800 Watts, divided by 1,000 = 28.8 kWh (kilowatt-hours) for one day.
28.8 kWh x 30 days = 864 kilowatt hours in one month.
864 kilowatt hours x your electric rate (Warren RECC's rate is .07) = the dollar amount.
864 x .07 = $60.48

A typical 18 cubic foot frost-free refrigerator will use approximately 720 watts when running, but only runs about 1/3 of the time; therefore, the formula must be modified by dividing by three. This will give a fair estimate, although lifestyle will still play a major role in energy use.
Calculating Watts
Volts x Amps = (Watts)
Calculating Amperes
Watts / Volts = (Amps)
Calculating Volts
Watts / Amps = (Volts)
Calculating Resistance (Ohms)
Volts/ Amps = R (Resistance)